
Basement renovation update (before carpet!)
Well, it's been a slow process but we have made some serious progress on the basement, and we're pretty much finished with the "construction" stage besides getting carpet installed in a few weeks. I've been sporadically putting updates on Instagram but I figured I should round some of it up here and detail our progress because why not?
As a quick reminder, here's where we started. I thought about adding some of those before photos in before I started pulling some for this post, and then I had about 80 to add here so I decided to spare you.
Some of the links below are Amazon affiliates.
When we left off, David and I had finished sanding all the new drywall patches on the wall, and were getting ready for paint and paneling. Happy to say that all the wall paint is done, the panels are done, and we're getting super close to the finish line! A pictorial timeline...

Step 1:
We started by painting the "seams" that would show in between our plywood panels. We're still undecided if we could have skipped this step, because the gap itself isn't very big so maybe the shadow would have been "dark" enough to show the gap? There wasn't a way to go back if it didn't work, though, so we played it safe and painted these stripes very loosely to make sure the gaps showed up very black. We also painted the strip at the top of the wall, because we wanted to make it really feel like it was floating on the wall and match the gaps.

Step 2:
David did a lot of math.
I mean, yeah, that's a big part of step 2 (sorta combined with step 1). We wanted to use 4x8 panels of 1/2" plywood, so we were balancing what we wanted the visual to look with against using the least amount of wood and making it all look symmetrical. We landed on nearly 24" panels (just stripping a 4x8 panel in half long-ways, but if you're familiar with lumber the actual size of wood isn't accurate, it's a rounded up number blah blah blah you get it).
Our wall, of course, was not exactly divisible by 24" -- but it was really close. David did some fancy shenanigans and after debating, we decided to make the two "corner" pieces on the long wall each a tiny bit bigger, and the end piece a little smaller, and I can tell you now you can't even tell at all. Yay!
After that we started adding the furring strips we used to attach our panels onto the wall. Cheap and easy! David would put liquid nails on the back of each furring strip, hold it in place for a couple seconds, then go back over each strip with his nail gun (we have this amazing Ryobi one and it has been worth its weight in gold for this project!).

Step 3:
You can see in the left of this photo where we reinforced our system to be able to mount the TV and our floating credenza. We were a tad worried that the combined weight would be just a little too much for furring strips and plywood, so some scrap pieces of plywood leftover from the kitchen renovation came in handy. David used longer screws, liquid nails, and his nail gun to fasten those to the studs behind the paneling that was already there.
I had to put our names somewhere in here, so this was also my solution... quickly free handed and quite possibly the worst date format you've ever seen in your life but I was working with limited space, alright? haha.

Step 4:
Paint, paint, and more paint! We took turns painting and installing things that required loud noises when the kids were either awake or asleep. Felix cooperated pretty well for most of this so I was actually able to help with this quite a bit! It helps tremendously that he takes two good naps during the day, too.
I love my Handy Paint Cup and yes it seems like...extravagant? to own a paint cup when you're just going to wash it out and any plastic cup would do, but I cannot tell you how amazing it is to have the handle on it so you can just balance it on your hand rather than work to hold a cup for hours. Again. Sounds dumb but super worth the money.
We ended up going with the exact same color as our fireplace upstairs: Sherwin Williams Peppercorn. It looks super moody and deep down here with the absolute zero natural light we get, and I'm pretty obsessed with how it turned out.


Wonderful photo composition right there but I loooove that dark corner where my desk is currently. It's so pretty!


Step 5:
Cut the panels.
We created this super janky...what's the word for it? jig? to try and guide our panels smoothly through David's table saw. It worked okay. We had to cut each of them with both of us, one on each end, slowly guiding it through and paying close attention to make sure it didn't wobble so our cuts were accurate. I think we messed up one sheet? Which out of cutting like 12 sheets is pretty good.
It was kind of a pain to do them all, and obviously you can see how much of a trash heap our garage turned into after doing it. Had to park in the driveway for a couple weeks but worth it!

Step 6:
Install panels!
We did the same process to install the panels as we did to install the furring strips, pretty much. David ran some liquid nails along the front edges of the furring strips, hoisted each panel up, leveled it, inserted our very fancy spacer in between each board to make them equal, and then had me hold it in place while he used the brad nailer to secure them doubly. It took us about a whole day to figure out the system and start in the corner in the picture above, and I think we got 5 panels done that day. Then the rest of them went very very smoothly which was a relief.
Because we wanted the top edge to appear as level to the eye as possible, David precut the panels to a certain height, and then would hand measure each one off the ceiling with his jig (a piece of board that we knew was straight) and then go cut them one by one in the garage. It made for a laborious process but was super helpful to make sure we were double and triple checking each one every time.

Step 7:
Of course the tricky bits were cutting around the outlets, because unlike with drywall you can't just patch a seam back together after cutting into it an easy way. I have to admit I wasn't watching when David cut them, but I'm pretty sure he used his Ryobi reciprocating saw (another game changer) to cut them out very, very carefully. (So carefully, in fact, that he had to go back and make a few of the holes bigger because he'd been so conservative in his cuts.)
Step 8:
Mostly because I was doing it, I don't think we have any photos of me polyurethaning the panels! I did it all by hand which in hindsight was maybe a waste of muscle, but nothing on the package said using a roller was OK so I didn't want to risk it.
We used this matte RustOleum floor finish (this but in matte finish, we got ours at Menards) because it was cheap and seemed like it would color the plywood the least. Two coats later and it was done! We could have kept going with multiple layers -- if you use it for a floor, you're supposed to do minimum of 4 coats and we did two -- but I only wanted to make sure that the ply didn't yellow too much, and two coats seemed plenty. You definitely have to do more than one coat, though, because water based polyurethanes raise the grain of wood on the first coat, so it feels worse after the first coat than it did before you started.

Step 9:
aka the battle with the pre-primed doors
We bought these beautiful doors from Menards, using their builder function on their website to get the custom size and design we wanted. They're lovely and solid and really exactly what we wanted for the two closet doors and the door to the back half of the basement, but THE PAINT WILL NOT STICK ON THEM.
David sunk 8 hours into painting them with our paint sprayer, using the same not-cheap-Sherwin-Williams paint we bought for the walls. Yeah, we probably should have sprung for another gallon of door and trim paint, but since we were going for a monochrome look I was worried the sheen would be off and so we just used the paint we already had.
Anyway, a couple coats in and we were still seeing little chips on the edges or the contact spots when we'd flip one of the doors back over to do the other side. I kept hoping it was just because we hadn't let the paint "cure" all the way... no dice. Brought them downstairs, and in the midst of installing the first one realized that almost any pressure or contact with the door causes all the layers of paint to just flake off immediately. You can just run your fingernail lightly down one of them and a bright white line will appear where the paint's all gone and the door is showing through.
Needless to say we are pretty upset and are gonna have to go back to Menards and ask them what the deal is, because we specifically bought PRE-PRIMED DOORS so that we didn't have to prime or prep them at all. There were no instructions like "please wipe down door" or "sand for paint adhesion" or anything so not sure if we're just dumb and we should have known to do that? But like... they're labeled pre-primed... shouldn't they be ready to paint? And maybe we were stupid trying to use regular paint but... it's just a door, a regular couple coats of paint as good quality as SW paint is should be able to adhere to almost any surface.
I'll keep you updated on that fascinating saga. There's always something with house projects! For the kitchen it was the tile fiasco, for this it's the doors... not a huge deal in the grand scheme of things but kind of upsetting when David spent so long carefully painting them.


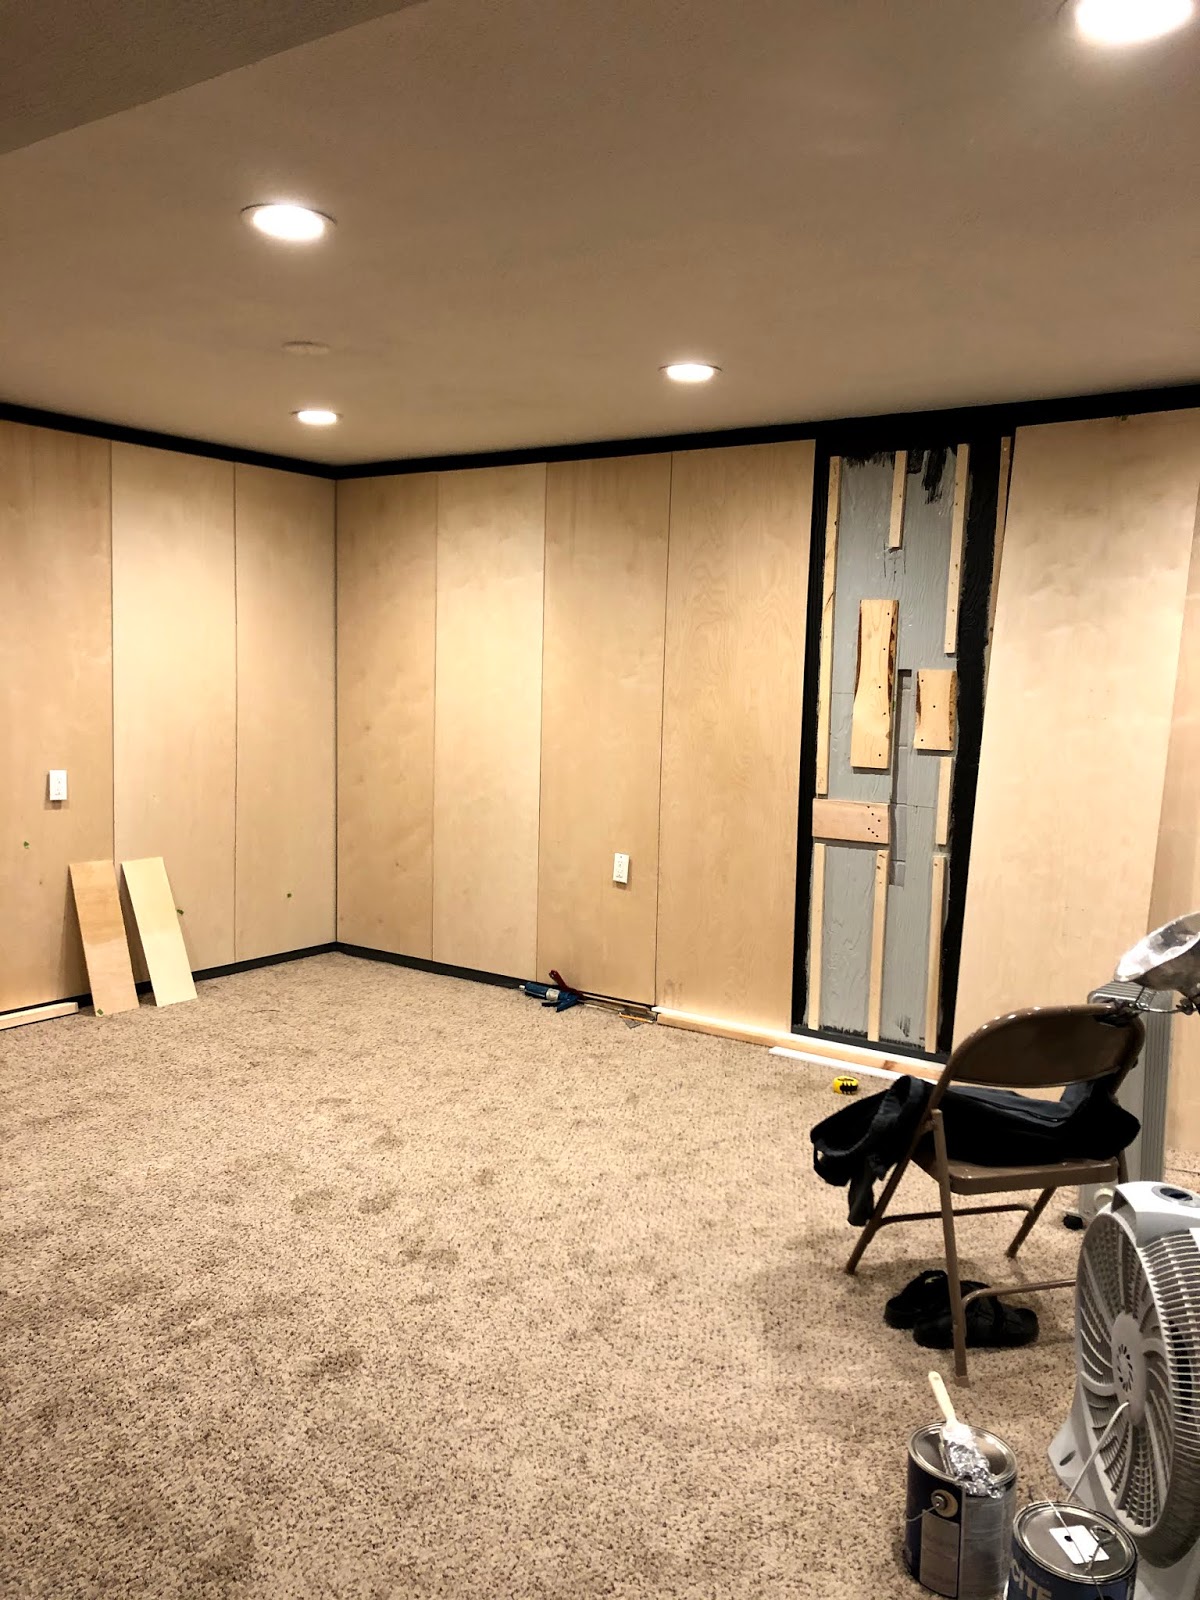
Here's where we are now! These photos are very poorly lit but they give you an idea... we're less of a construction zone now but still not all the way done.
Carpet installation is scheduled for the Wednesday before Thanksgiving, so I'm crossing my fingers that we'll have most everything finished by Christmas. That's probably ambitious but oh well. Gotta have big dreams!
As a quick reminder, here's where we started. I thought about adding some of those before photos in before I started pulling some for this post, and then I had about 80 to add here so I decided to spare you.
Some of the links below are Amazon affiliates.
When we left off, David and I had finished sanding all the new drywall patches on the wall, and were getting ready for paint and paneling. Happy to say that all the wall paint is done, the panels are done, and we're getting super close to the finish line! A pictorial timeline...
Step 1:
We started by painting the "seams" that would show in between our plywood panels. We're still undecided if we could have skipped this step, because the gap itself isn't very big so maybe the shadow would have been "dark" enough to show the gap? There wasn't a way to go back if it didn't work, though, so we played it safe and painted these stripes very loosely to make sure the gaps showed up very black. We also painted the strip at the top of the wall, because we wanted to make it really feel like it was floating on the wall and match the gaps.
Step 2:
David did a lot of math.
I mean, yeah, that's a big part of step 2 (sorta combined with step 1). We wanted to use 4x8 panels of 1/2" plywood, so we were balancing what we wanted the visual to look with against using the least amount of wood and making it all look symmetrical. We landed on nearly 24" panels (just stripping a 4x8 panel in half long-ways, but if you're familiar with lumber the actual size of wood isn't accurate, it's a rounded up number blah blah blah you get it).
Our wall, of course, was not exactly divisible by 24" -- but it was really close. David did some fancy shenanigans and after debating, we decided to make the two "corner" pieces on the long wall each a tiny bit bigger, and the end piece a little smaller, and I can tell you now you can't even tell at all. Yay!
After that we started adding the furring strips we used to attach our panels onto the wall. Cheap and easy! David would put liquid nails on the back of each furring strip, hold it in place for a couple seconds, then go back over each strip with his nail gun (we have this amazing Ryobi one and it has been worth its weight in gold for this project!).
Step 3:
You can see in the left of this photo where we reinforced our system to be able to mount the TV and our floating credenza. We were a tad worried that the combined weight would be just a little too much for furring strips and plywood, so some scrap pieces of plywood leftover from the kitchen renovation came in handy. David used longer screws, liquid nails, and his nail gun to fasten those to the studs behind the paneling that was already there.
I had to put our names somewhere in here, so this was also my solution... quickly free handed and quite possibly the worst date format you've ever seen in your life but I was working with limited space, alright? haha.
Step 4:
Paint, paint, and more paint! We took turns painting and installing things that required loud noises when the kids were either awake or asleep. Felix cooperated pretty well for most of this so I was actually able to help with this quite a bit! It helps tremendously that he takes two good naps during the day, too.
I love my Handy Paint Cup and yes it seems like...extravagant? to own a paint cup when you're just going to wash it out and any plastic cup would do, but I cannot tell you how amazing it is to have the handle on it so you can just balance it on your hand rather than work to hold a cup for hours. Again. Sounds dumb but super worth the money.
We ended up going with the exact same color as our fireplace upstairs: Sherwin Williams Peppercorn. It looks super moody and deep down here with the absolute zero natural light we get, and I'm pretty obsessed with how it turned out.
Wonderful photo composition right there but I loooove that dark corner where my desk is currently. It's so pretty!
Step 5:
Cut the panels.
We created this super janky...what's the word for it? jig? to try and guide our panels smoothly through David's table saw. It worked okay. We had to cut each of them with both of us, one on each end, slowly guiding it through and paying close attention to make sure it didn't wobble so our cuts were accurate. I think we messed up one sheet? Which out of cutting like 12 sheets is pretty good.
It was kind of a pain to do them all, and obviously you can see how much of a trash heap our garage turned into after doing it. Had to park in the driveway for a couple weeks but worth it!
Step 6:
Install panels!
We did the same process to install the panels as we did to install the furring strips, pretty much. David ran some liquid nails along the front edges of the furring strips, hoisted each panel up, leveled it, inserted our very fancy spacer in between each board to make them equal, and then had me hold it in place while he used the brad nailer to secure them doubly. It took us about a whole day to figure out the system and start in the corner in the picture above, and I think we got 5 panels done that day. Then the rest of them went very very smoothly which was a relief.
Because we wanted the top edge to appear as level to the eye as possible, David precut the panels to a certain height, and then would hand measure each one off the ceiling with his jig (a piece of board that we knew was straight) and then go cut them one by one in the garage. It made for a laborious process but was super helpful to make sure we were double and triple checking each one every time.
Step 7:
Of course the tricky bits were cutting around the outlets, because unlike with drywall you can't just patch a seam back together after cutting into it an easy way. I have to admit I wasn't watching when David cut them, but I'm pretty sure he used his Ryobi reciprocating saw (another game changer) to cut them out very, very carefully. (So carefully, in fact, that he had to go back and make a few of the holes bigger because he'd been so conservative in his cuts.)
Step 8:
Mostly because I was doing it, I don't think we have any photos of me polyurethaning the panels! I did it all by hand which in hindsight was maybe a waste of muscle, but nothing on the package said using a roller was OK so I didn't want to risk it.
We used this matte RustOleum floor finish (this but in matte finish, we got ours at Menards) because it was cheap and seemed like it would color the plywood the least. Two coats later and it was done! We could have kept going with multiple layers -- if you use it for a floor, you're supposed to do minimum of 4 coats and we did two -- but I only wanted to make sure that the ply didn't yellow too much, and two coats seemed plenty. You definitely have to do more than one coat, though, because water based polyurethanes raise the grain of wood on the first coat, so it feels worse after the first coat than it did before you started.
Step 9:
aka the battle with the pre-primed doors
We bought these beautiful doors from Menards, using their builder function on their website to get the custom size and design we wanted. They're lovely and solid and really exactly what we wanted for the two closet doors and the door to the back half of the basement, but THE PAINT WILL NOT STICK ON THEM.
David sunk 8 hours into painting them with our paint sprayer, using the same not-cheap-Sherwin-Williams paint we bought for the walls. Yeah, we probably should have sprung for another gallon of door and trim paint, but since we were going for a monochrome look I was worried the sheen would be off and so we just used the paint we already had.
Anyway, a couple coats in and we were still seeing little chips on the edges or the contact spots when we'd flip one of the doors back over to do the other side. I kept hoping it was just because we hadn't let the paint "cure" all the way... no dice. Brought them downstairs, and in the midst of installing the first one realized that almost any pressure or contact with the door causes all the layers of paint to just flake off immediately. You can just run your fingernail lightly down one of them and a bright white line will appear where the paint's all gone and the door is showing through.
Needless to say we are pretty upset and are gonna have to go back to Menards and ask them what the deal is, because we specifically bought PRE-PRIMED DOORS so that we didn't have to prime or prep them at all. There were no instructions like "please wipe down door" or "sand for paint adhesion" or anything so not sure if we're just dumb and we should have known to do that? But like... they're labeled pre-primed... shouldn't they be ready to paint? And maybe we were stupid trying to use regular paint but... it's just a door, a regular couple coats of paint as good quality as SW paint is should be able to adhere to almost any surface.
I'll keep you updated on that fascinating saga. There's always something with house projects! For the kitchen it was the tile fiasco, for this it's the doors... not a huge deal in the grand scheme of things but kind of upsetting when David spent so long carefully painting them.
Here's where we are now! These photos are very poorly lit but they give you an idea... we're less of a construction zone now but still not all the way done.
Carpet installation is scheduled for the Wednesday before Thanksgiving, so I'm crossing my fingers that we'll have most everything finished by Christmas. That's probably ambitious but oh well. Gotta have big dreams!
Comments
Post a Comment
Thank you so much for your comment! Check back here for my reply. :)