
Fireplace before and after
This project has been a *long* time coming. Admittedly for very good reason, but still, a long time coming.
We started dreaming about adding a fireplace to this house soon after we moved in. I've mentioned it before, but it was honestly the only thing on my "wishlist" for our new house in Omaha that didn't get checked off. I figured we'd probably just wait until our next house to have one, never dreaming that 1) we could afford to put one in and 2) it would be so (relatively of course) easy. (More on both those later.)
Guys, get you a husband who is willing to do crazy things and research the hell out of projects just because you ask him to. David is a g-e-m.
Anyway! Let's get started.
When we moved in, this is what the living room, which is at the front of the house, looked like. The previous owners had done a mini flip, where they painted a lot of the house but did actually a decent job of updating stuff to a relatively blank canvas, without ruining most of the nice original stuff (the hardwoods, mostly).

That wall you see in the back of the photo is where we eventually put the fireplace. For a long time, the room pretty much looked like this:

With variations of furniture/rugs/actual window coverings instead of just a blanket draped over the window like hooligans.
It's a nice big room, but with basically no architectural detail it seemed missing something, no matter how many times I made David rearrange the furniture. Originally I was thinking we'd just do a board and batten assembly there, but that didn't seem like quite enough. I'm not sure when it became a serious discussion, but eventually we both were like, okay, why don't we just add a fireplace, if that's what we want?
After many hours of research on Pinterest, we settled on this image for our inspiration:
We knew we wanted something midcentury modern, to a certain degree, because our house was built in 1957 and that's somewhat the style of what already exists. (One of my pet peeves is when houses get flipped or remodeled and don't match their architectural style.) We also knew we wanted wood tones, and we liked the dark gray fireplace, especially in contrast to how many white shiplap fireplaces you see these days. Being somewhat on trend but a smidge different is the name of our renovation game, most of the time.
Since we wanted to keep the project in a reasonable budget range, a gas fireplace was out of the question. They make some seriously solid electric fireplaces now, and by solid I mean they cost like 1/4th of the cost of a gas one, and get you just as good ambiance (in my opinion). David did a lot of research to find one that 1) vented forward and ONLY forward, 2) was kid-friendly, and 3) was in our price range. (Affiliate link to Amazon ahead!) He settled on this Touchstone fireplace from Amazon. Now, I wouldn't call it cheap, because it's $500. But when you factor in that literally all you have to do is plug it into the wall, it is pretty great.
Once we'd settled on a fireplace, David put his mathematical brain to work and sketched us up a plan.

This is exactly why I would never tackle DIY without his help. I'd be done after trying to calculate one tiny thing. Math is not my strong suit -- in fact, I don't even think it's in my hand. We had this all planned out and then David got cancer (such a weird sentence still) so we paused for awhile. After he was home and feeling better, we resumed!
First of all, David wired a new circuit to the wall behind where the fireplace would go, to give us enough electrical power to plug the fireplace and all our electronics into. See yellow hanging wire below. I think technically he did that one step before his stint in the hospital, but my memories from that time are a tad hazy, so forgive me.

Once he was up to it, David used 2x4s to frame out the opening for the fireplace, and away we went.


We used the old tried-and-true method of child blocking, moving furniture in front of things so they can't get to it, to babyproof while the project was going on. It was pretty effective, tbh.

His framing was mostly focused on having an opening for the fireplace, and making sure there were horizontal studs sturdy enough to support a TV, a mantle, and whatever else we weren't accounting for. From what he's told me, the framing is pretty simple and similar to framing out walls. Honestly I did very little to help this bit, minus took a few photos and kept the children away from the power tools. The fireplace itself isn't all that heavy (maybe 50 lbs at the most?) so we weren't too worried about that. Lots of Youtube tutorials helped us out, too, including ones specifically for building an opening for that fireplace.
Originally I wanted to do an actual brick front, even with an electric fireplace. The only thing we could structurally support, though, would be some sort of veneer or lightweight faux stone, and none of those looked good enough IRL to commit to. So, although shiplap is a little bit trendy, that was the next best option. (Spoiler alert: I love it and am so glad we went that way.)

After a little bit of miscommunication, which is too involved to go into, progress went along relatively smoothly. I would say this was probably the most labor-intensive part of the whole process. It involved measuring each board, spacing it out evenly, cutting the edges perfectly so they matched up, and then screwing them in.

Voila!
Okay those two picture transitions make it seem really easy but that was basically almost one solid weekend of David traipsing in and out of our house to the saw in the garage. He's a very hard worker.
At this point, I was almost tempted to leave it with just the raw wood because it's gorgeous. But it seemed a little too modern to just leave it stark, so we forged ahead -- after filling in all the screw holes with wood filler, sanding, repeating. David also took a Dremel to the edges so they were a little more softened and not quite as uneven, because even with all the work and precision he did, it was still somewhat obvious in different spots that the edges didn't meet up perfectly. But the Dremel worked great and now it's not obvious at all!
Next was painting.

I made sure this time to buy samples and leave the swatches up for a few days to determine which one we really liked the best. We went with the far right, Sherwin Williams Peppercorn, because it seemed the best mix between the other two -- brown undertone, but dark.

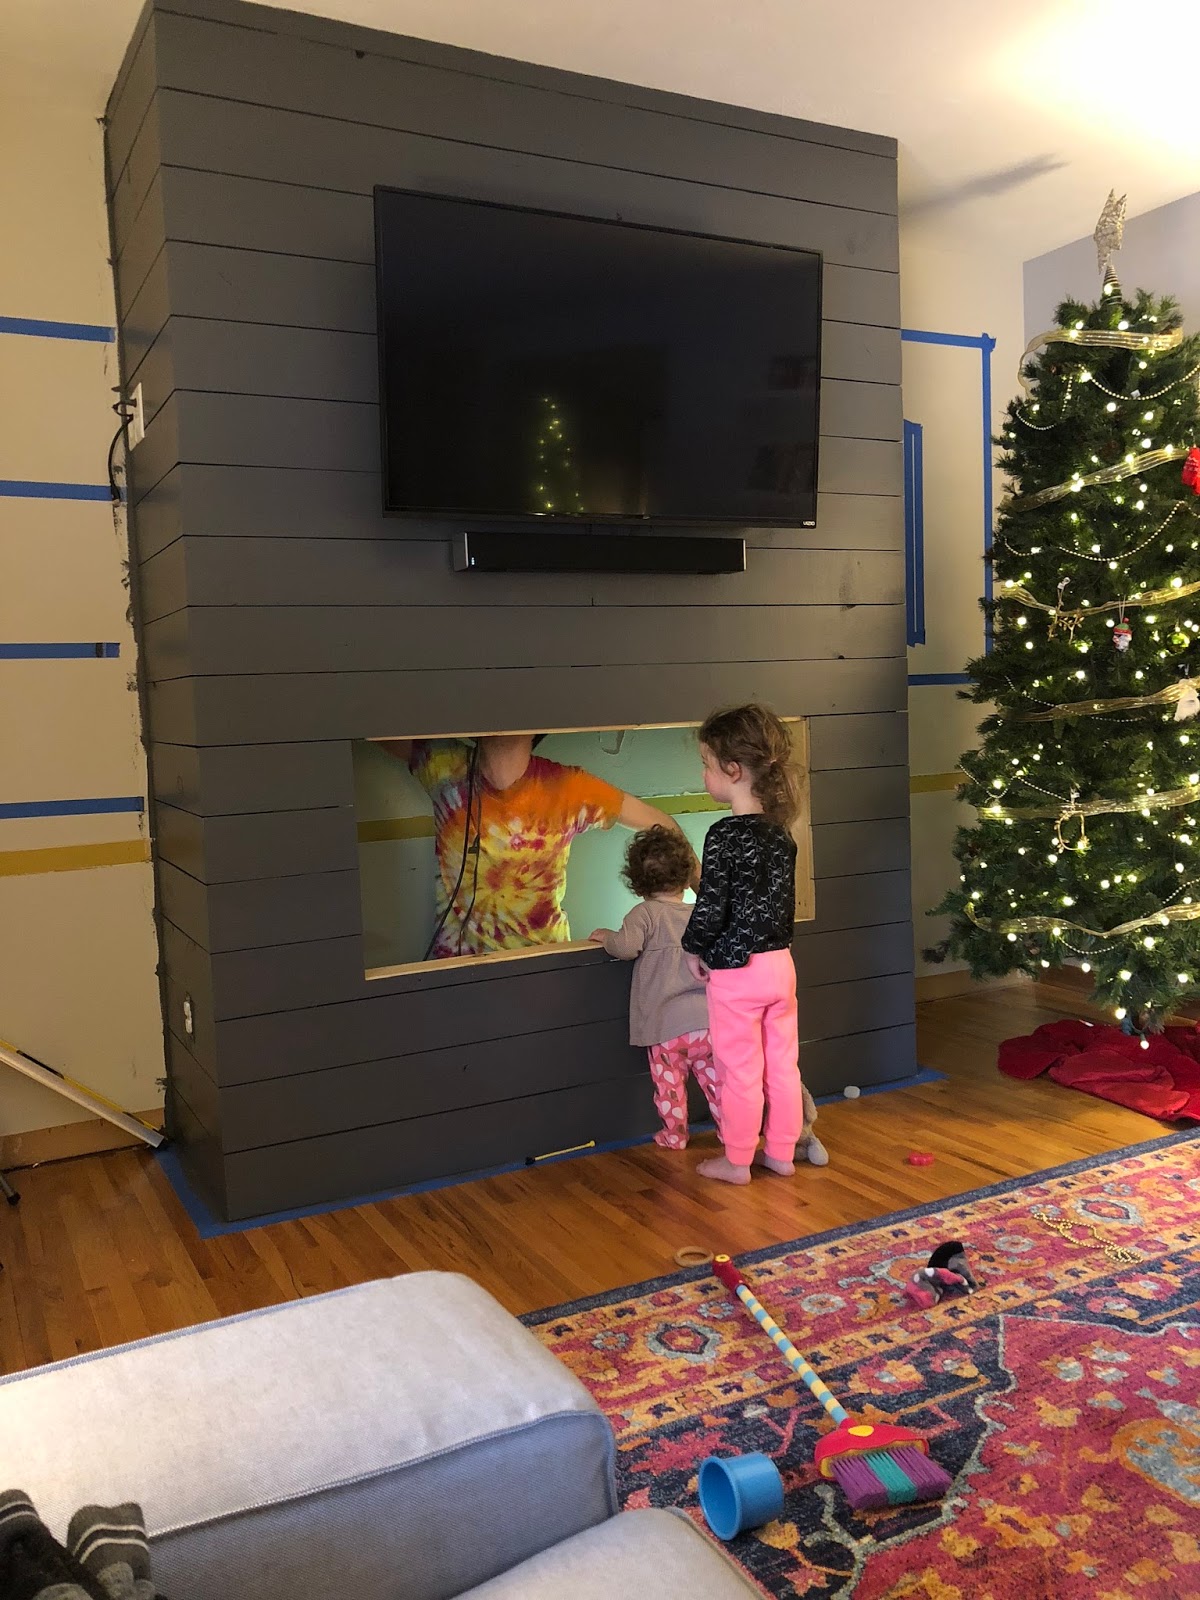
Even with the swatches not painted yet, we decided to try and tape out where the TV/soundbar/mantle would go, just to make sure that everything would fit before we got any farther, and to help David figure out where to cut out the outlet spots (which you can see in the above photo). I highly recommend doing this, because it helped us visualize it in the room and determine the type of TV stand we got, etc.

Then painted!
Guys, if you ever install something shiplap, for the love of all that is good and holy DO NOT MAKE THE MISTAKE WE DID.
Mostly because we hadn't decided on a paint color, we put all our boards up and then painted. It was nigh on impossible to paint in between the cracks of this dumb thing. If you ever do something like it, and you're not using pre-painted shiplap, PAINT THE EDGES OF YOUR BOARDS BEFORE YOU INSTALL THEM.
We probably could have saved 6+ hours on this project had we done that. It is a nightmare I wouldn't wish on my worst enemy. We ended up painting all the cracks on the inside of the fireplace, using a piece of cardboard as a paintbrush to get into the cracks, and then also painted the wall behind the fireplace to make sure there wasn't any "light" leaking through behind it. It was a pain in the you-know-what so please, please, never do this. #diyaintalwayspretty
Ahem.
We got this TV stand, which seemed relatively easy to work, but honestly I didn't help that much with this part either (I think David did it by himself when I was gone one night). I'm not sure if we'd buy this TV stand again, because it took a lot of adjustment to get it to be level...but that's kind of what we get for buying a $20 TV stand. Oh well. The soundbar came with its own mounting equipment.

As you can see in the photo above, David also wired an outlet to the left-hand side, where one of our shelves would go, for our extraneous TV stuff (DVD player and antenna box, etc.).
Next up was the shelves and the paneling!
The paneling we decided to put behind the shelves on either side of the fireplace was this cedar tongue-and-groove planking from Menards. I had debated between full-board paneling, mostly beadboard, but the stuff we found in-stores around here was not authentic enough, and beadboard itself seemed like it wasn't the right style. I was afraid the whole thing would look too cheap if we picked something sub-par, so we looked around for awhile before landing on this. I think technically most people use this stuff for inside closets, but it was totally the right choice and pretty simple to install because it hooks together, and then David just hand-nailed it in.

It comes in 8 ft. height, our ceiling height, so that also cut way down on the labor costs. I think David only had to trim a few pieces, and the ones at the edges.


David then cut some pine boards for our shelves, I stained them, and we installed them with simple L brackets. After that was the mantle. We found a 4"x6"x8' fir mantle at our local lumber yard, sanded it a little bit, and then stained it to match the shelves. (Millard Lumber is where we found it, for anyone in Omaha). The only thing they carry in that size at most places like Home Depot/Menards/etc. is pre-treated outdoor lumber, and obviously we didn't want to use that.

Very professionally, aka using things we found in the garage, David placed it where we wanted it, and then drilled it into the studs he had created using 6 long screws and 6 shorter ones. It's really solid in there, and it wasn't all that heavy of a piece, so we feel good about it -- this was the part David was the most nervous about, but it's definitely doable.
That was the last step, besides plugging and putting the fireplace in. We had a little snafu with the hole being just a tiny tiny bit too small, so David had to sand down the edges of the opening for awhile but we're going to pretend that didn't really happen -- so next are the after pics! YAY!


I'm a noob at styling shelves, so these are definitely going to change a bunch, and I'm still on the lookout for a new coffee table, but otherwise we're pretty much done and it feels SO good. Walking down the hallway from our bedroom to the living room makes me happy-sigh when I catch sight of it every single time.
One more time for good measure:

People don't really come to my blog for sources of things but I'm gonna link them anyway (just in case I need to find a replacement myself in the future; honestly half the reason I blog is for my own memory-keeping so might as well, right?). (FYI the coffee table and chair were thrifted.)
couches (IKEA) // floor lamp (Target) // short lamp (Target) // dark pillow (Target, Hearth and Hand) // rug (Target) // fireplace (Amazon) // clock on shelves (Target) // art on wall (Artfully Walls) // hanging frame (Target, Hearth and Hand) // picture shelves (IKEA) // old house portrait (Etsy) //
Hope you enjoyed that very long-winded post, and let me know if I can answer any questions you might have!
HG
We started dreaming about adding a fireplace to this house soon after we moved in. I've mentioned it before, but it was honestly the only thing on my "wishlist" for our new house in Omaha that didn't get checked off. I figured we'd probably just wait until our next house to have one, never dreaming that 1) we could afford to put one in and 2) it would be so (relatively of course) easy. (More on both those later.)
Guys, get you a husband who is willing to do crazy things and research the hell out of projects just because you ask him to. David is a g-e-m.
Anyway! Let's get started.
When we moved in, this is what the living room, which is at the front of the house, looked like. The previous owners had done a mini flip, where they painted a lot of the house but did actually a decent job of updating stuff to a relatively blank canvas, without ruining most of the nice original stuff (the hardwoods, mostly).
 |
| photos from house listing on Zillow, I'm not gonna link it because that's our address lol |
That wall you see in the back of the photo is where we eventually put the fireplace. For a long time, the room pretty much looked like this:
With variations of furniture/rugs/actual window coverings instead of just a blanket draped over the window like hooligans.
It's a nice big room, but with basically no architectural detail it seemed missing something, no matter how many times I made David rearrange the furniture. Originally I was thinking we'd just do a board and batten assembly there, but that didn't seem like quite enough. I'm not sure when it became a serious discussion, but eventually we both were like, okay, why don't we just add a fireplace, if that's what we want?
After many hours of research on Pinterest, we settled on this image for our inspiration:
 |
| Midcentury Modern Home via Airows.com (found on Pinterest) |
Since we wanted to keep the project in a reasonable budget range, a gas fireplace was out of the question. They make some seriously solid electric fireplaces now, and by solid I mean they cost like 1/4th of the cost of a gas one, and get you just as good ambiance (in my opinion). David did a lot of research to find one that 1) vented forward and ONLY forward, 2) was kid-friendly, and 3) was in our price range. (Affiliate link to Amazon ahead!) He settled on this Touchstone fireplace from Amazon. Now, I wouldn't call it cheap, because it's $500. But when you factor in that literally all you have to do is plug it into the wall, it is pretty great.
Once we'd settled on a fireplace, David put his mathematical brain to work and sketched us up a plan.
This is exactly why I would never tackle DIY without his help. I'd be done after trying to calculate one tiny thing. Math is not my strong suit -- in fact, I don't even think it's in my hand. We had this all planned out and then David got cancer (such a weird sentence still) so we paused for awhile. After he was home and feeling better, we resumed!
First of all, David wired a new circuit to the wall behind where the fireplace would go, to give us enough electrical power to plug the fireplace and all our electronics into. See yellow hanging wire below. I think technically he did that one step before his stint in the hospital, but my memories from that time are a tad hazy, so forgive me.
Once he was up to it, David used 2x4s to frame out the opening for the fireplace, and away we went.
We used the old tried-and-true method of child blocking, moving furniture in front of things so they can't get to it, to babyproof while the project was going on. It was pretty effective, tbh.
His framing was mostly focused on having an opening for the fireplace, and making sure there were horizontal studs sturdy enough to support a TV, a mantle, and whatever else we weren't accounting for. From what he's told me, the framing is pretty simple and similar to framing out walls. Honestly I did very little to help this bit, minus took a few photos and kept the children away from the power tools. The fireplace itself isn't all that heavy (maybe 50 lbs at the most?) so we weren't too worried about that. Lots of Youtube tutorials helped us out, too, including ones specifically for building an opening for that fireplace.
Originally I wanted to do an actual brick front, even with an electric fireplace. The only thing we could structurally support, though, would be some sort of veneer or lightweight faux stone, and none of those looked good enough IRL to commit to. So, although shiplap is a little bit trendy, that was the next best option. (Spoiler alert: I love it and am so glad we went that way.)

After a little bit of miscommunication, which is too involved to go into, progress went along relatively smoothly. I would say this was probably the most labor-intensive part of the whole process. It involved measuring each board, spacing it out evenly, cutting the edges perfectly so they matched up, and then screwing them in.
Voila!
Okay those two picture transitions make it seem really easy but that was basically almost one solid weekend of David traipsing in and out of our house to the saw in the garage. He's a very hard worker.
At this point, I was almost tempted to leave it with just the raw wood because it's gorgeous. But it seemed a little too modern to just leave it stark, so we forged ahead -- after filling in all the screw holes with wood filler, sanding, repeating. David also took a Dremel to the edges so they were a little more softened and not quite as uneven, because even with all the work and precision he did, it was still somewhat obvious in different spots that the edges didn't meet up perfectly. But the Dremel worked great and now it's not obvious at all!
Next was painting.

I made sure this time to buy samples and leave the swatches up for a few days to determine which one we really liked the best. We went with the far right, Sherwin Williams Peppercorn, because it seemed the best mix between the other two -- brown undertone, but dark.
Even with the swatches not painted yet, we decided to try and tape out where the TV/soundbar/mantle would go, just to make sure that everything would fit before we got any farther, and to help David figure out where to cut out the outlet spots (which you can see in the above photo). I highly recommend doing this, because it helped us visualize it in the room and determine the type of TV stand we got, etc.
Then painted!
Guys, if you ever install something shiplap, for the love of all that is good and holy DO NOT MAKE THE MISTAKE WE DID.
Mostly because we hadn't decided on a paint color, we put all our boards up and then painted. It was nigh on impossible to paint in between the cracks of this dumb thing. If you ever do something like it, and you're not using pre-painted shiplap, PAINT THE EDGES OF YOUR BOARDS BEFORE YOU INSTALL THEM.
We probably could have saved 6+ hours on this project had we done that. It is a nightmare I wouldn't wish on my worst enemy. We ended up painting all the cracks on the inside of the fireplace, using a piece of cardboard as a paintbrush to get into the cracks, and then also painted the wall behind the fireplace to make sure there wasn't any "light" leaking through behind it. It was a pain in the you-know-what so please, please, never do this. #diyaintalwayspretty
Ahem.
We got this TV stand, which seemed relatively easy to work, but honestly I didn't help that much with this part either (I think David did it by himself when I was gone one night). I'm not sure if we'd buy this TV stand again, because it took a lot of adjustment to get it to be level...but that's kind of what we get for buying a $20 TV stand. Oh well. The soundbar came with its own mounting equipment.
As you can see in the photo above, David also wired an outlet to the left-hand side, where one of our shelves would go, for our extraneous TV stuff (DVD player and antenna box, etc.).
Next up was the shelves and the paneling!
The paneling we decided to put behind the shelves on either side of the fireplace was this cedar tongue-and-groove planking from Menards. I had debated between full-board paneling, mostly beadboard, but the stuff we found in-stores around here was not authentic enough, and beadboard itself seemed like it wasn't the right style. I was afraid the whole thing would look too cheap if we picked something sub-par, so we looked around for awhile before landing on this. I think technically most people use this stuff for inside closets, but it was totally the right choice and pretty simple to install because it hooks together, and then David just hand-nailed it in.
It comes in 8 ft. height, our ceiling height, so that also cut way down on the labor costs. I think David only had to trim a few pieces, and the ones at the edges.

David then cut some pine boards for our shelves, I stained them, and we installed them with simple L brackets. After that was the mantle. We found a 4"x6"x8' fir mantle at our local lumber yard, sanded it a little bit, and then stained it to match the shelves. (Millard Lumber is where we found it, for anyone in Omaha). The only thing they carry in that size at most places like Home Depot/Menards/etc. is pre-treated outdoor lumber, and obviously we didn't want to use that.
Very professionally, aka using things we found in the garage, David placed it where we wanted it, and then drilled it into the studs he had created using 6 long screws and 6 shorter ones. It's really solid in there, and it wasn't all that heavy of a piece, so we feel good about it -- this was the part David was the most nervous about, but it's definitely doable.
That was the last step, besides plugging and putting the fireplace in. We had a little snafu with the hole being just a tiny tiny bit too small, so David had to sand down the edges of the opening for awhile but we're going to pretend that didn't really happen -- so next are the after pics! YAY!
I'm a noob at styling shelves, so these are definitely going to change a bunch, and I'm still on the lookout for a new coffee table, but otherwise we're pretty much done and it feels SO good. Walking down the hallway from our bedroom to the living room makes me happy-sigh when I catch sight of it every single time.
One more time for good measure:
People don't really come to my blog for sources of things but I'm gonna link them anyway (just in case I need to find a replacement myself in the future; honestly half the reason I blog is for my own memory-keeping so might as well, right?). (FYI the coffee table and chair were thrifted.)
couches (IKEA) // floor lamp (Target) // short lamp (Target) // dark pillow (Target, Hearth and Hand) // rug (Target) // fireplace (Amazon) // clock on shelves (Target) // art on wall (Artfully Walls) // hanging frame (Target, Hearth and Hand) // picture shelves (IKEA) // old house portrait (Etsy) //
Hope you enjoyed that very long-winded post, and let me know if I can answer any questions you might have!
HG
It looks AMAZING!! And I'm sending this post to my SIL...her and my brother bought a great house but it doesn't have a fireplace, which is one thing she really wanted. They've been talking about installing one!
ReplyDeleteGorgeous Gorgeous Gorgeous!!!!
ReplyDeletetest
ReplyDelete