
Garage organization, the after!
I shared the afters of the garage already on Instagram (like two months ago, lol), but I haven't had a chance to write a blog post up with the better photos I took. Today is the day! At least, in "today" meaning more like "as many days as it takes me to write this up, probably more like 7 altogether because my life is a crazy mess and I'm trying to work full time and homeschool." hahaha. IT'S FINE WE'RE FINE.

Both David and I are super pleased with where we ended up with the garage as a whole. It wasn't exactly an "exciting" project from the start -- more of a necessity than a desire. As I mentioned in the last post, we'd been using such a huge area as just a dumping ground without any sort of organization or clear purpose.
It's really surprising, especially in a place like a garage, the effect that a fresh coat of paint and a good scrubbing can do to freshen things up. We didn't paint everywhere in here (there were definitely areas worse off than others, so we saved ourselves some time) but I'm so glad we went to the work of the paint and prep that we did. It feels so clean!
Let's get down to the after tour, right? That's what you're here for? ;)
We'll start from the front area of the garage and work our way around.


These two walls are usually covered by our cars (as in, you know, the first purpose of a garage...to store cars...haha) so we can't see them in their organized glory but there is a certain slice of my brain that just sighs with happiness seeing this sort of thing. So organized! So professional-looking! So useful! We tried to separate the functions to each half -- so most of the tools are on the side by the house and the toys/sports paraphenalia on the opposite. I think we need another clip or two (because some are doubled up, if you can't tell) but it's already so nice.


Here's some side views so you can see how little they stick out from the wall. It's so nice! We can still park relatively close to the sides so there's a path through when the cars are in, and everything is in its place.
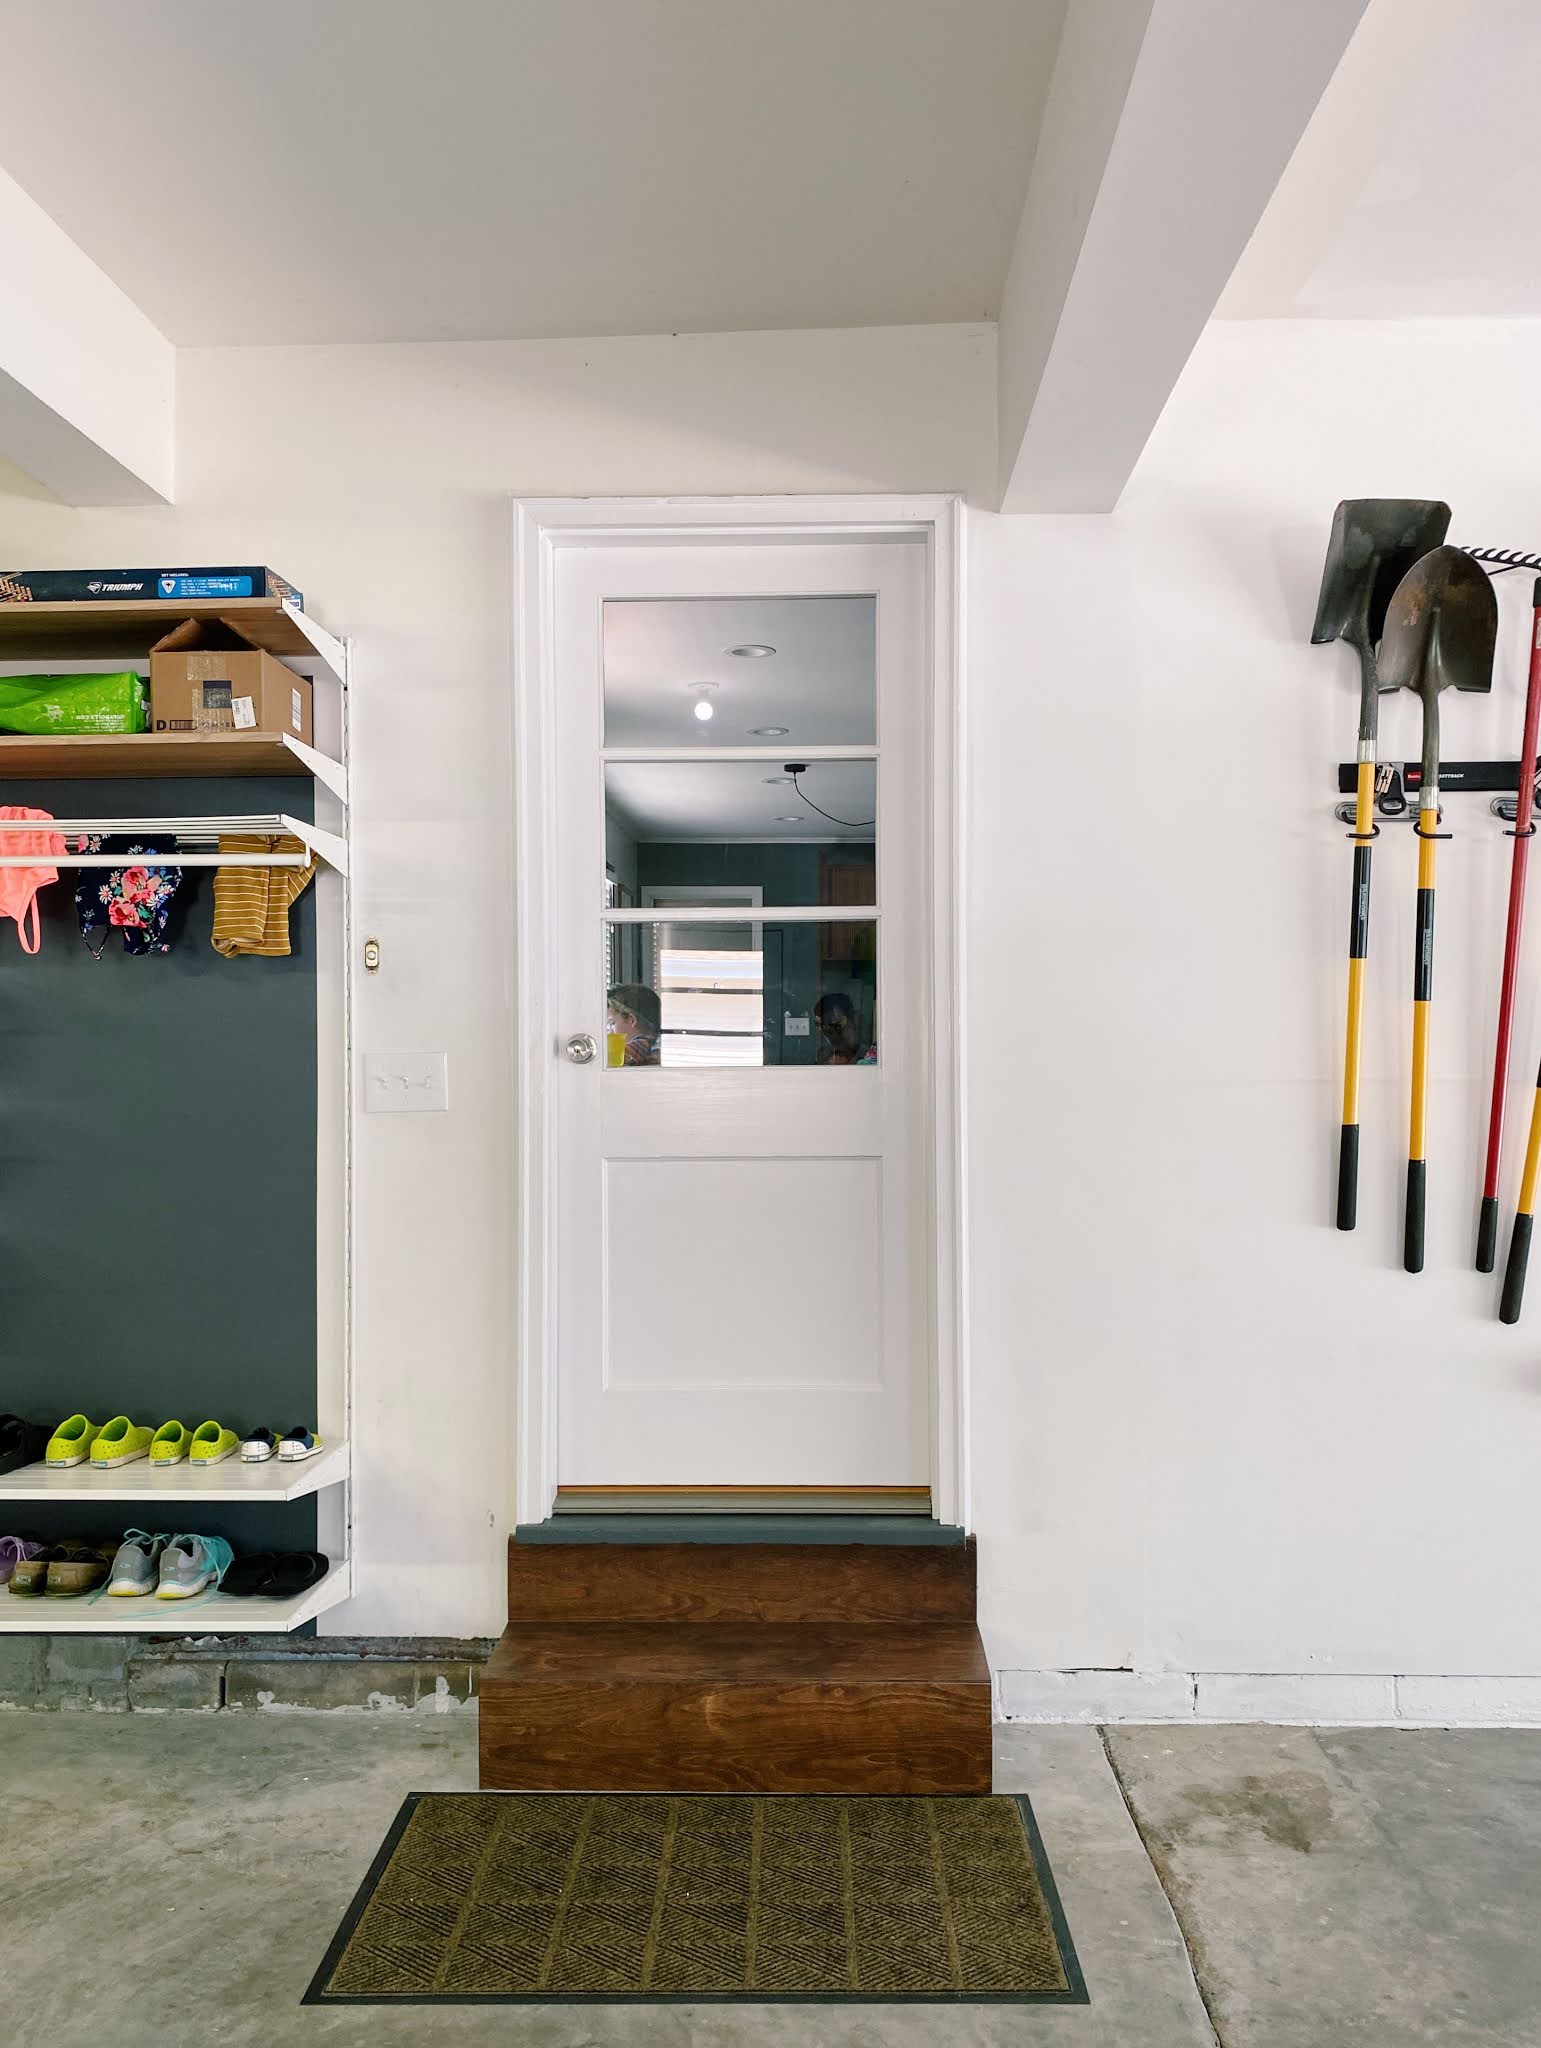
Moving around the garage, we come to the door into the house, aka basically the only way we come into and out of our house. We considered at one point replacing the door to possibly add a screened door here, but man, doors are expensive. So we settled for some scrubbing (Kitty and Cora had a blast scrubbing the door and trim with wet rags) and paint all around, and covered the existing steps with a layer of plywood, stain, and about 18 layers of polyurethane. So satisfying!

Directly next to the stairs into the house is our new faux "mudroom." This door leads directly into the kitchen, so there's no room whatsoever for shoe storage, coat storage, etc. We'd been piling shoes by this door since we moved in but now they actually have a place for them!
The system we got was, of course, from IKEA (our favorite!). It's the Boaxel shelf storage system. I think I had one of the others more in mind when we started, but they were sold out or discontinuing it, so this was a fine replacement. Of course, doing anything in home improvement during a pandemic isn't easy, so we ordered this at the end of May and it didn't get to our house until mid-July. We spent $215 for this (including the $49 delivery) which was much more affordable than any of the other places I looked (Home Depot, The Container Store, etc.). If this was our forever house, I think we would have considered DIY-ing a wooden system, or spending a little bit more on a nicer system, but this was the perfect mix of easy and affordable for this house.
Oh, and if you look closely at the left-hand side of the system up there, I took this picture before one missing piece arrived -- so there should be a matching shelf there (and is now, I just took the photos awhile ago haha).

Here's a pulled-back shot of this side of the garage! Including our lovely wood storage, which I talked about in the last post, and the current placement of the mower and leaf blower (aka the most fun thing we own in our entire house, seriously, I'm obsessed with using it for every job). The fridge and full-sized freezer we have out here is how we simultaneously shop at Costco and have a counter-depth fridge in our kitchen. ;)
The previous owners stored old cars in this half of the garage, hence all the discolored cement. Down the line someday we'd like to epoxy the floor to cover it up, because now that you can see much more of the floor it's wayyyyy more obvious that it's gross. Someday!


This corner of our garage is where the doors lead to our backyard. They're nothing fancy but it's nice to be able to open them up really widely (since they're double doors) if we need to fit something through and let some light into the garage.
Eventually over the work bench we're going to add some more task lighting, since there are just these overhead fluorescents there now, but David can't exactly decide what he wants so we're holding off for now.
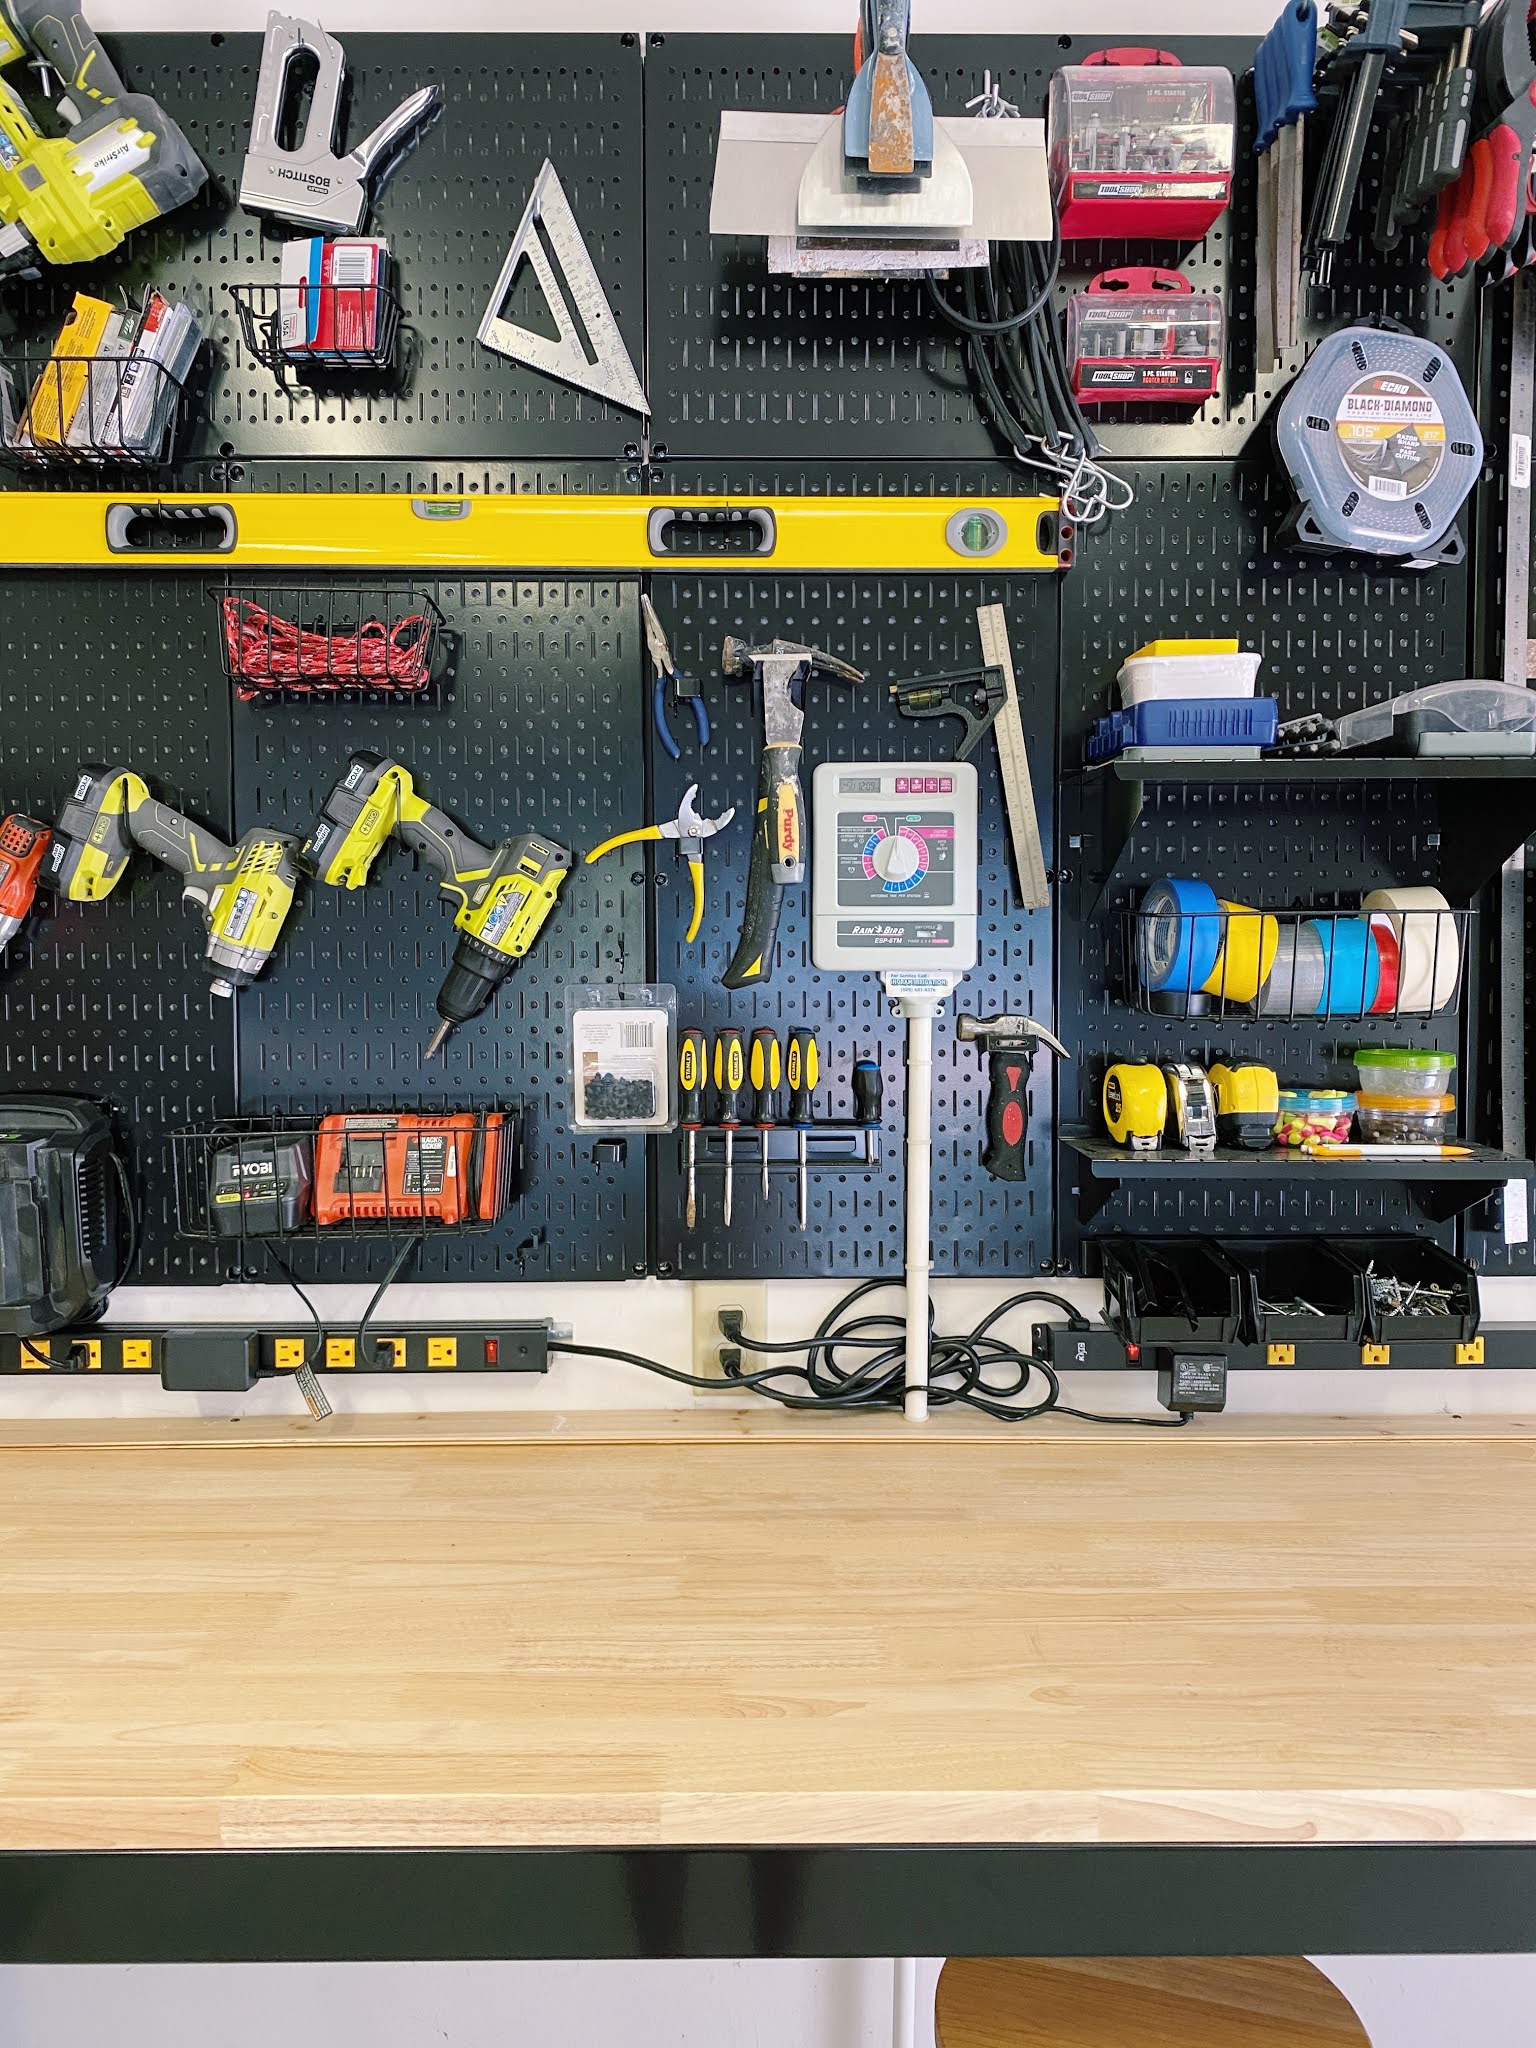

The housing for the sprinkler system here on this back wall confused us for awhile. It's just an electrical cord running inside that tube and we spent a couple weeks being like, okay we'll lower it, we'll move it to the side, yadda yadda yadda until we realized it would wiggle enough to just keep it as is and mount it on top of the peg board. We breathed a big sigh of relief when that was realized...best to keep things as complication-free as possible.
The peg board has added a ton of functionality over here. Prior to this we had the cheap plywood or MDF pegboards you can get really cheap from Menards or Home Depot, but the things we were storing on it were causing it to break and crack in certain spots because of the weight. David did a lot of research and bought these Wall Control metal versions, 6 oriented vertically across the bottom and 3 oriented horizontally across the top. The work bench underneath was a birthday present from David's parents (bought on sale) purchased from Home Depot, and the red metal stool is also from Home Depot!
For a garage so big, the other thing missing out here is outlet space. David put up these long horizontal mountable surge protectors to make it so we'd always have enough space to plug things in. Looking at it now the amount of available outlets seems a tad excessive (I'm not sure when we'd ever need, like, 55 outlets at the same time) but it made sense to orient them so there'd always be one close to where we wanted.

We never did really find a *great* solution for the bikes, so here they have remained since the beginning of the garage's evolution. Right now we just prop them up, and hook the adult bike (singular) on the wall (although we have two spots, since we got rid of David's old rickety bike a few months ago). It's serviceable and we have the space to just keep them there.

I don't have a good picture of it, but we also got this storage shelf for the corner that has been a HUGE organization help. It holds all of our weird things that need to be accessible but can't be in the above-head storage: gas for the mower, various other poisons and motor oils, coolers, the fertilizer spreader, planting equipment, air compressor, shop vac, etc.
We ran into the issue of our jutting-out cement baseboard that was keeping the shelf from being flush against the wall. Our cheap solution was to just put our extraneous loose cement blocks around near the front, and place the shelf up on them *and* the baseboard. It works great and prevents loose tennis balls or construction debris from rolling under the shelf. Everything on there is extremely heavy, as is the shelf itself, so we're not worried about it ever tipping.


This wall of garage storage was one of the first things we purchased for this house, actually, as a reward for moving to Omaha with David's new job (and his excitement about having a giant garage for projects). We've loved it ever since but our amount of stuff had completely outgrown it. Now that it's pared down a little bit it's so much nicer and I think we'll actually be able to utilize it and keep it organized.
Plenty of room for Husker memorabilia to display on it, too, if you didn't notice. ;)


Swinging further around we come to the door that exits to nearest our fence gate. There's like, 6 ft. of yard between this door and our fence so it's not a highly trafficked area but man, it was in terrible, terrible shape. Years of full sun exposure had done a number on the paint and trim -- luckily we added a splash of really fun orange over here to brighten it up! The orange is Behr's Exotic Blossom (lol, paint names) and it's truly the perfect bright orange. After painting this door I immediately wanted it elsewhere so we also painted the front door and the back door the same to match. ;)


Above the garage door is where we added the other Fleximount systems. They were kind of a PITA to install, only because they're very heavy and sturdy, but we now have tons of bins to keep things in (tiling supplies, extraneous lighting stuff, you name it) and there are even still 3 empty bins for room to expand! Second picture is to demonstrate how we get stuff down -- David can barely reach and push out an empty tub, otherwise we have to get a ladder, so it really is suited for more long-term storage.


Nearing the end, I promise!!!


The last two photos I will bore you with (I'm amazed if you made it this far) are the best perspective photos I could really get of the enormity of this garage in its completed stage. It really is huge, with tons of spare room and workable areas. It's not nearly as perfect as it "could be" because, you know, budget, and time, and all that, but it's really such a transformation.
If there's anything I forgot to link or explain, please tell me in the comments and I'd love to clarify -- it literally did take me two weeks to finish this blog post, and I only have 3 minutes before Felix wakes up from his nap, so I'm gonna leave it like it is. Thanks for being here!!!
HG
Super functional! You guys did an amazing job, it all looks so professional!
ReplyDelete